Automating the (FlexRadio) Shack with Elgato Stream Deck
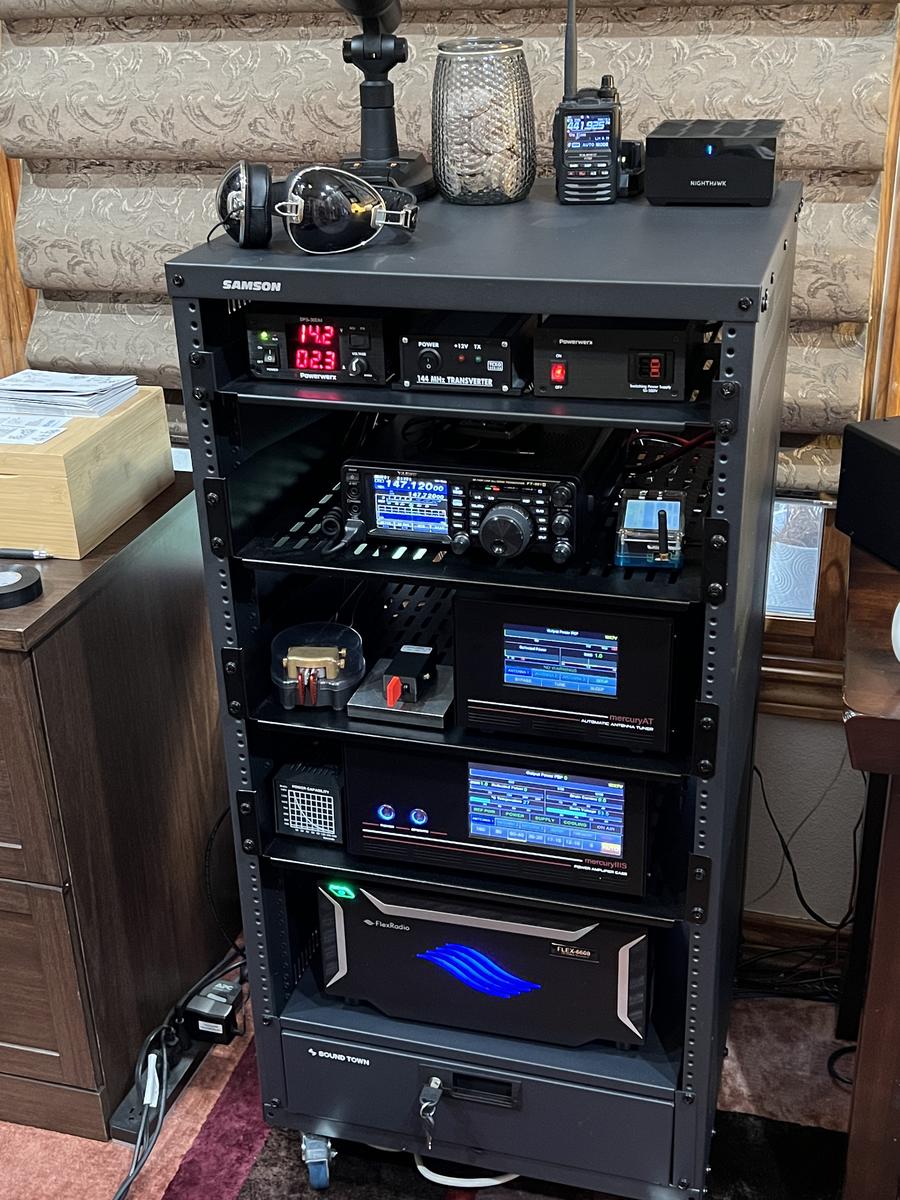
I have had a lot of fun building my shack since getting my license back in May 2020. My primary rig is a Flexradio 6600, feeding an 80-6 meter off center fed (OCF) dipole multi-band antenna mounted at 35 feet. I also have a Mercury IIIs solid state amplifier and Mercury AT automatic tuner but most of the time I run barefoot. SSB and CW are my favorite operating modes. In addition to RWK, I’m a member of the Old Man International Side Band Society (OMISS #13552) and the Straight Key Century Club (SKCC #25995T). Like many of you I also actively work POTA when there’s not much else going on.
Along with the Flex I have a Yaesu FT-dx3000 and a Yaesu FT-991A. Both are fine radios but I prefer the Flexradio. The last time I ran the FT-dx3000 was about a year ago when I had to send the 6600 down to Austin for two weeks for repairs (the damage was self induced).
The FLEX-6000 series SDR Transceivers are great, but many functions one would expect in SmartSDR are missing- presumably for open source developers to implement using the APIs provided by the Flexradio platform. You can search with “works with flexradio” to get an idea of the rich ecosystem of tools and utilities that have been built to address these gaps.
I like SDRs, but I prefer the buttons and dials of a radio over the mouse clicks of a PC. I tried the FlexControl, which is an external USB controller sold by Flexradio Systems, but with 3 buttons and 1 dial I found it too limited. This is where the Elgato Stream Deck shines. At $150 it’s a fraction of the price of a Maestro (which is currently out of stock, and on backorder for more than a year, but I digress). The Stream Deck connects to the PC via USB, where it can run scripts, execute system commands, trigger events, and control non-flex amplifiers and tuners with the use of other aftermarket USB controlled Relays.
The PC runs FRStack which provides hotkeys (keyboard shortcuts) and REST APIs (web interface) to control the radio, SDR-Bridge to integrate spots into the panadapter from CW Skimmer, and K9DUR which provides the memory keyer, swr plotter, and reads sensors to display the radios power and temperature. I’ve also written a few batch files that let me start up and shutdown my shack in a way that is optimal for me.
My Stream Deck has 15 physical buttons that can be programmed to perform different actions. Virtual “pages” of additional buttons can be added as needed. The buttons can be configured with custom icons, colors and text to make it easy to remember what action the button will perform. The Stream Deck also lets you create multiple profiles, so that you can further customize it for other uses. I have a few test profiles set up that lets me explore plugins, webhooks and new features without breaking my main set up. The Stream Deck has a configurable screen saver and sleep mode which is fun to play with.
Under my default profile I have configured three pages of buttons. These buttons use a combination of windows system calls, Hot-Keys (keyboard shortcuts) and batch files. I added a plug-in to let me use REST APIs instead of HotKeys so that I can avoid conflicts with keyboard shortcuts across different apps. REST APIs are pretty neat but took some time to get working successfully.
The default page in my profile has a “Start” button which triggers 8 actions on the PC. These actions start the SmartSDR client, my logger, and the other “works with flex” applications I always want running like FRStack. The ‘Stop’ button has a batch file to shutdown these same apps. Buttons can also be programmed to launch a browser and load specific URLs. Handy for QRZ or the POTA SPOTS home page.
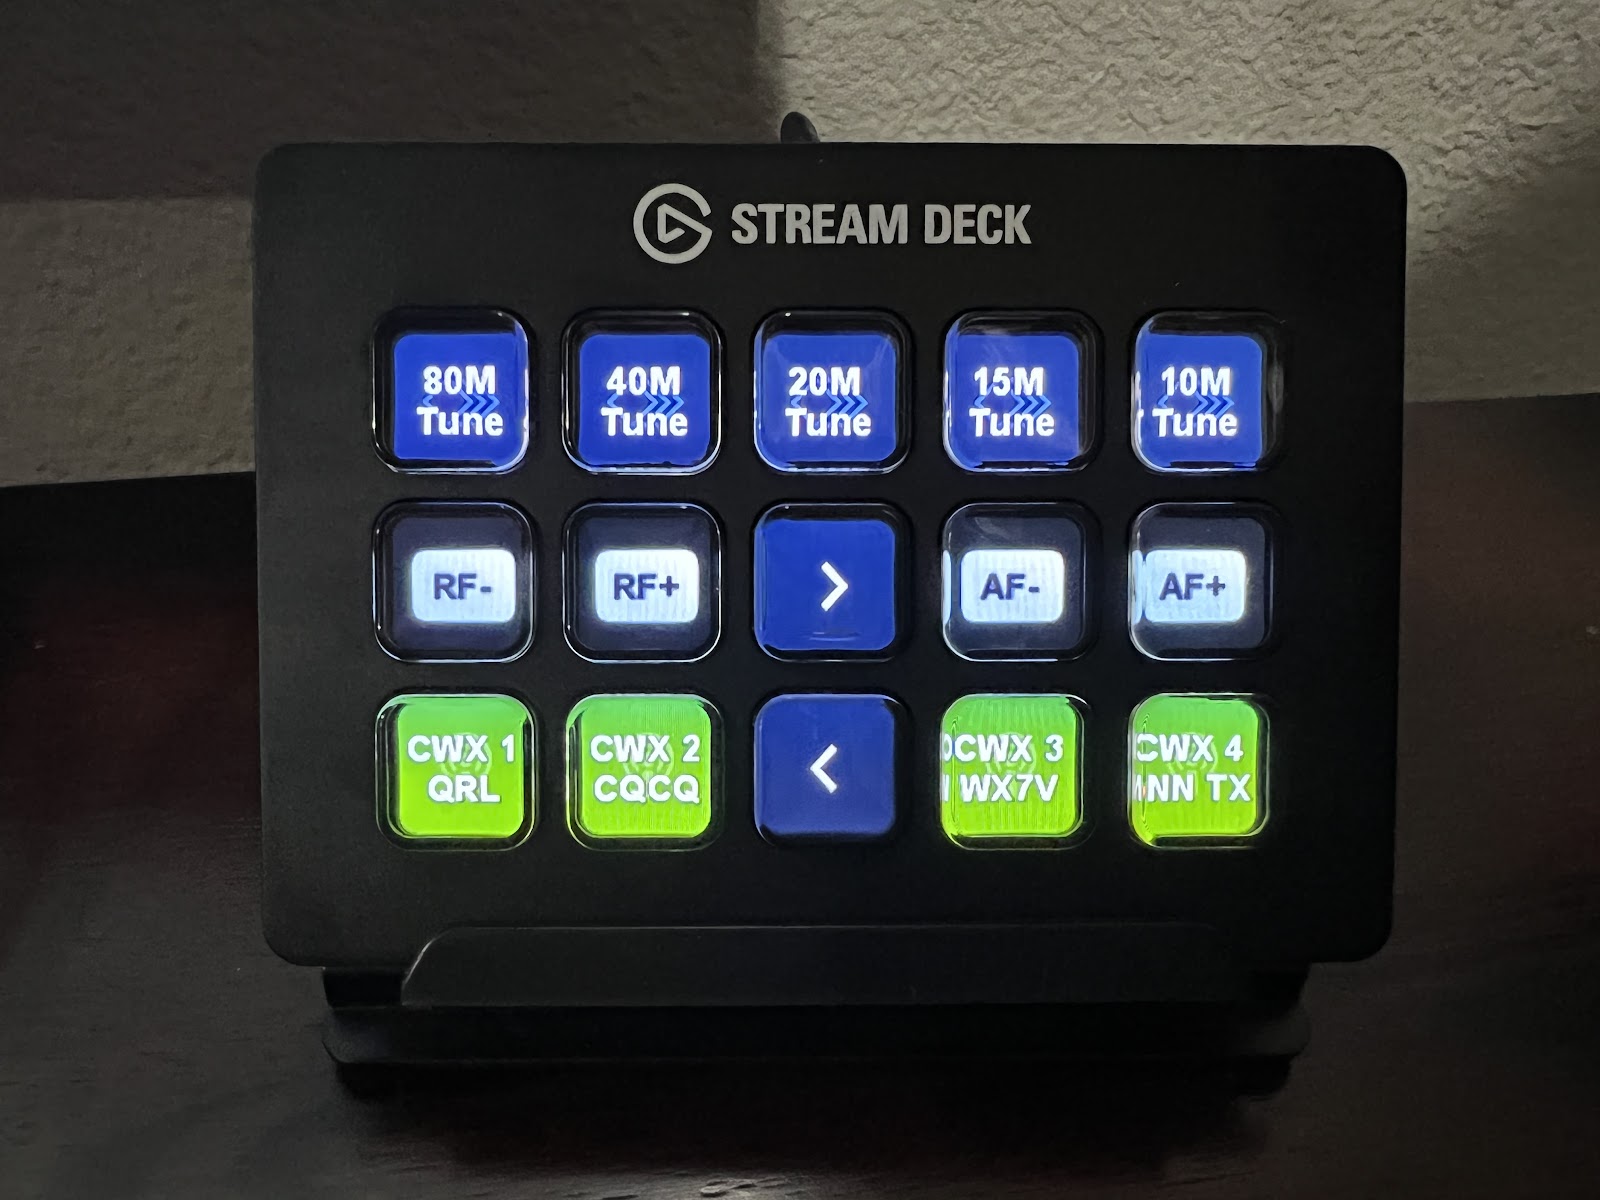
In the picture below, I have programmed the other buttons for commonly used radio functions to set the MODE, XIT, and GAIN. The REC/PLAY buttons let me record the active slice- useful if I can’t fully copy another operator's call sign. The arrow button lets me access the second page of programmable buttons.

The second page is where things get interesting. Each of the buttons on the top row executes six actions, the only difference being the frequency I want to set. These actions first trigger a USB controlled relay to puts my AT into tune mode, then sets the mode and frequency on the radio (3.550 for 80M, 7.055 for 40M, etc), then invokes the TUNE function on SmartSDR. I use a few timers to make the actions play nicely together. This allows me to quickly QSY and retune the system when needed.
The middle row of functions control RF and AF gain as on the home page. I replicated them here for convenience. The bottom row invokes the keyer memories to send CW using SmartSDR (QRL, CQ, Call Sign, 599 etc). These are really useful for POTA and CW contests and are found on most radio. I’ve created a third page of functions, just like the second, but with the WARC bands. If I were running FT8 on a regular basis I’d probably add pages to support that mode as well.
So to recap, the Stream Deck buttons are programmable, and each button can be programmed to execute a combination of actions: run batch files on my PC, trigger USB controlled relays, interface to FRStack to use hot-keys and REST APIs to control the FlexRadio, and to run batch files to start/stop my shack in a graceful manner.
Getting the USB controlled relay working was a fun project on its own. The ability to trigger an external relay makes it easy to control just about anything with the press of a button from the Stream Deck.
There are a lot of inexpensive USB controlled relay options on Amazon, but I settled on a $10 really with a CH340 USB controller chip that is FB. The USB Relay is wired to a TRS connector, which is plugged into the TuneReq input on my Mercury AT tuner. The AT needs a momentary switch to close the connection between RING and SLEEVE to trigger the tuning mode.
I use a program called SerialSend.exe within a batch program to trigger the relay by sending the following hex strings to the serial port, which is COM3 in my case:
Turn on the relay: A0 01 01 A2
Turn off the relay: A0 01 00 A1
As with any relay, you wire it up based on the application - normally open, normally closed, and common. Using the NO/COM connections from the relay to the TRS cable, turning on the relay closes the connection, and turning the relay off opens it again.
Stream Deck is still in active development, and the company has released a number of form factors and accessories: a mini and xl version, lights, cameras, mics, foot pedals etc. But I feel those are designed for audio video production, podcasts etc and not necessary for me. There’s an app to use the Stream Deck on your iPhone or tablet but that service requires a monthly subscription.
I’ve just barely scratched the surface of the Stream Deck but so far I’ve been very happy with the results! I’m interested in hearing from others who have used Stream Deck especially in a non-flexradio related environment.
73 Chris de WX7V


Comments